Puppet and Foreman demarcation (Part II)

This describes our assignment of responsibility between Foreman and Puppet. For an overview, please see Part I .

Old Configuration

Our original configuration relied primarily on Foreman to define services, required classes and their supply configuration parameters. This left puppet to solely provide a mix of modules (ie autofs, etc) and profile-like classes which would be glued together by foreman at the Host Group level. When we started down the path we were on Ubuntu 12.04 (~2013) and running Foreman 1.2 or 1.3. Config Groups were not yet and option and the UI tended to force most configuration overrides to occur when configuring classes.

At first, this configuration worked well, however it soon became unwieldy list of classes (400+) that were listed in foreman and the assignment per host started to get quite cluttered. For example the configuration of a research VM running our standard R setup was three Host Groups deep, and had 27 different classes whose configuration was keyed off a mix of host group and domain. Managing this, and determining what got applied where and ensuring configuration changes didn’t have unintended side effects became a burden. Additionally, adding new classes meant weeding through the 400+ included to find what you needed. In addition, as the groupings and configuration were all in Foreman, creating a development environment was a fairly manual process of recreating the host groups and applying all the configuration overrides.

The configuration we were performing on classes fell into two categories, service-based config where items like db names and who has access to a service would vary depending on the service and the static configs for items like overall domain configuration, core apt repo’s that would almost never vary once setup.

In hindsight, setting up ignored_environments.yml would have saved us some heartache and led to a cleaner class list. It wouldn’t have led to clarity on the filesystem of easily knowing which modules were top level modules (ie, foreman directly applies) vs modules that were installed to fulfil dependencies.

New Configuration

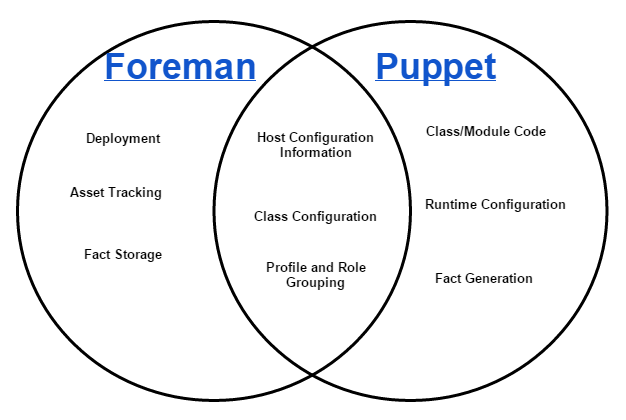
In our new configuration, we realized that we needed to draw a line between where configuration and class application should occur. This can be a bit tricky as there is substantial overlap between what foreman provides and what puppet provides.

foremanpuppet

In deciding whether foreman or puppet should be responsible for a particular item we decided to use the following guidelines:

  • Use foreman to determine what a host is. Foreman should be the starting point to seeing what classes have been applied to a host and at a quick glance give someone an idea of what services/processes should be running.
  • There should be a single point of connection between foreman and puppet.
  • Only service-level config in foreman, not domain or global configs.

We started by looking at the Roles and Profiles pattern in Puppet and seeing how we could adapt this to Foreman. The first mapping that was pretty obvious is that a Foreman config group is a puppet role. Both do not allow parameters and both are supposed to be composed only of classes. So config groups or roles? In order to allow an admin logged into foreman to see what services are running on a host, we decided to use Foreman config groups in favor of Puppet roles.

The next step was to reduce the surface area between foreman and puppet to clearly defined lines of control. Previously we had directly included any puppet module in a config group and applied configuration on foreman via smart parameters. This time, following the profile pattern, we define one profile per service and expose only these profiles to foreman by filter in ignored_environments.yml.

:filters:
 - !ruby/regexp '/^(?!role|profile).*$/'

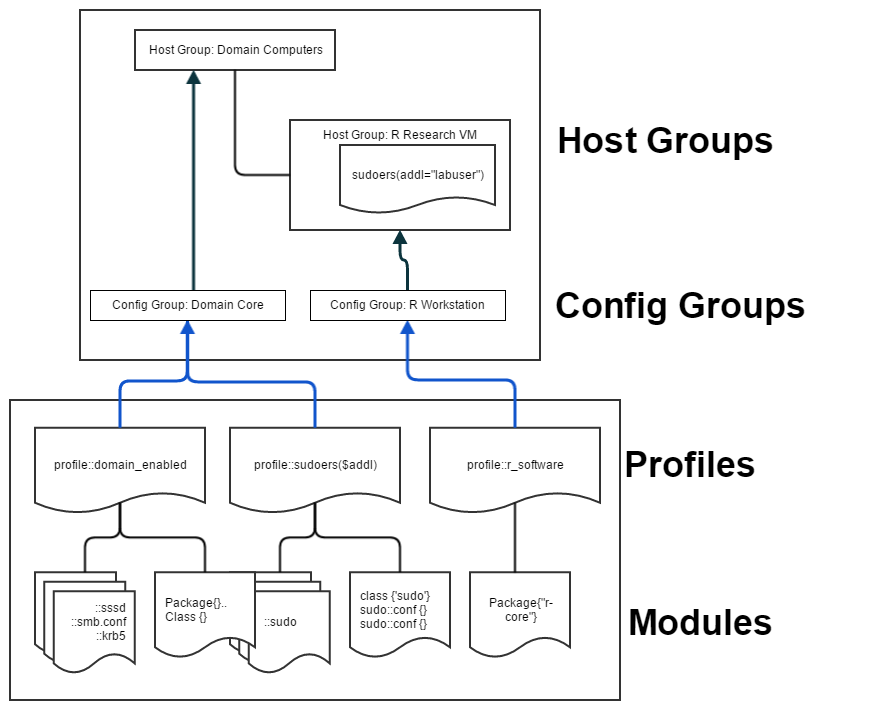
These profiles have configurable service configuration exposed to foreman as parameters. Where possible, sane defaults for our environments are provided if we decide to even expose a parameter rather than configure it in the profile class.  These profiles are combined using config groups and applied to Host Groups. The diagram below shows roughly what this looks like:

foremanpuppetstructure

What about Hiera?

We considered using Hiera to manage global configuration options, but after mocking up some workflows and seeing how little data we would actually have in it vs foreman decided to just put those configuration values in the various profiles. A second reason for not using Heira was to reduce the number of places to look for configuration. While not too bad, using Hiera would have let to a second code repo which would have required careful synchronization with the main puppet code repo. We may revisit this in the future as the need arises.

A moment of clarity with Puppet and Foreman (Part I)

Over the past four years we’ve deployed a puppet/foreman environment to support Ubuntu 12.04 and 14.04 for our research and production Linux systems. As 12 is approaching end of life and there are no longer Foreman updates available we decided it was a good time to revisit our overall puppet/foreman integration. Over the years it had slowly grown to include a bit of cruft and needed a good haircut. In addition, during the past four years, Foreman had added additional features which made it a good time revisit how the two communicate and where the hand-off in responsibility lie. So with that introduction, the environment we deployed had the following goals and challenges in mind:

  • Clearly define the hand-off between Foreman and Puppet.
    • Profiles and roles vs smart parameters vs host groups vs config groups.
  • Create a clear development to production workflow.
    • Module updating, development, testing.
    • How do we support operational testing (ie, patching, etc) vs longer term development.
  • Improve git integration (yeah, part of above, but a major motivation in of itself)
    • How can we support multiple development efforts?

Final Environment

Skipping ahead to the end, our final Foreman environment consists of the following. We ended up creating a separate dev and production environment which were 100% independent, yet mirrors of each other. We developed a workflow for allowing each developer to have their own environment and setup a clean separation between this development environment and the testing environment/production environment. This allows the production side to quickly test and apply security and other upstream updates without impacting longer term development efforts.

Foreman and Puppet

  • Two Foreman instances, dev and production, each on its own subnet.
  • Only profile classes and their parameters are exposed to foreman.
  • Configuration groups within foreman are used to create roles.
  • Multiple base host groups, one for each subnet/authentication domain.
    • Base host group handles core auth/patching.
    • Second level host groups create services (ie, HPC Cluster Node) and have configuration groups applied, and contain all hosts.
  • Hosts/services are created in pairs, a patch-testing and production both on the production environment.
    • Each production has a corresponding test host which mirrors production and is used to test patches and other minor updates.
    • The testing host also serves as a recovery point, meaning that a nightly backup can quickly be applied and it can be moved into a production role.
  • Development VM’s are attached to the dev foreman server and are short lived hosts for developing and debugging puppet configurations.

Git and Environments

  • Single git repo for puppet all puppet modules and profiles.
  • Git branches mostly correspond to puppet environments
    • ie: development == /etc/code/pupplabs/code/environments/development
    • production – production environment on production foreman server
    • development – set as ‘production’ on development foreman server, development on production foreman.
    • Each developer/sysadmin has their own environment on the dev server, within their environment they can switch to the appropriate branch or use their own developer forks
  • Code workflow:
    1. Developer or sysadmin works in own branch.
    2. Pull request to development branch and import on dev server.
    3. Review and testing in development (if substantial chages, additional step of verifying on production server development environment)
    4. Pull request to production and set parameters.

In parts two and three, I’ll cover a bit more about the motivation and detail behind this setup.

Some additional reading:

Shotwell Plugins, Part I – Setup

Here’s a quick overview on how to start writing a custom publishing plugin. This is being done on Ubuntu 14.04, so no promises it will function on any other version.

  1. Install valac-0.22, libgphoto2-dev, gnome-doc-utils,libgstreamer-plugins-base1.0-dev, libgee-0.8-dev libsqlite3-dev libraw-dev librest-dev libwebkitgtk-3.0-dev libgexiv2-dev libgudev-1.0-dev libgtk-3-dev libjson-glib-dev
  2. Download the shotwell 0.20.2 sources and not the current version from github. The current version in get uses some new gtk features which are not available in ubuntu 14.04.
  3. Copy the shotwell/samples/simple-plugin from the shotwell git repo to a new directory
  4. Build/install shotwell 0.20
    $ ./configure --install-headers
    $ sudo make -j6 install


  5. In your new plugin, run ‘make; make install’ to ensure the basic build works.
  6. Rename simple-plugin.vala to your publishing plugin name (ie, OnedrivePublishing.vala)
  7. Modify the Makefile and set the PROGRAM to your plugin name (ie, OnedrivePublishing)
  8. Running make should compile your new empty plugin.

Now that that’s done we can start creating out publishing plugin.

The plugin sample implements the Spit.Pluggable interface, in order to create a publishing plugin, we’ll need to use that to return our publishing module and create a new class to implement the Spit.Pluggable and Spit.Publishing.Service interface as well. Rename that class and include all the necessary interfaces. We’ll use the ShotwellPublishingCoreServices as a template for how to bootstrap out publishing service.

The basic do-nothing module which compiles w/ one warning (the return null) now contains the following:

extern const string _VERSION;
private class OnedriveModule : Object, Spit.Module {
    private Spit.Pluggable[] pluggables = new Spit.Pluggable[0];

    public OnedriveModule() {
        pluggables += new OnedriveService();
    }
    
    public unowned string get_module_name() {
        return _("OneDrive Publishing Services");
    }
    
    public unowned string get_version() {
        return _VERSION;
    }
    
    public unowned string get_id() {
        return "org.yorba.shotwell.publishing.onedrive";
    }
    
    public unowned Spit.Pluggable[]? get_pluggables() {
        return pluggables;
    }
}
// This is our new publishing class
private class OnedriveService : Object, Spit.Pluggable, Spit.Publishing.Service {
        

    public OnedriveService() {
    }

    public unowned string get_id() {
        return "org.yorba.shotwell.publishing.onedrive";
    }
    
    public Spit.Publishing.Publisher.MediaType get_supported_media() {
        return (Spit.Publishing.Publisher.MediaType.PHOTO |
            Spit.Publishing.Publisher.MediaType.VIDEO);
    }
    public Spit.Publishing.Publisher create_publisher(Spit.Publishing.PluginHost host) {
        //TODO
        return null;
    }

    public void get_info(ref Spit.PluggableInfo info) {
        info.authors = "Mike Smorul";
        info.version = _VERSION;
        info.is_license_wordwrapped = false;
        
    }    
    public unowned string get_pluggable_name() {
        return "OneDrive";
    }

    public int get_pluggable_interface(int min_host_interface, int max_host_interface) {
        return Spit.negotiate_interfaces(min_host_interface, max_host_interface,
            Spit.Publishing.CURRENT_INTERFACE);
    }
    
    public void activation(bool enabled) {
    }
}
// This entry point is required for all SPIT modules.
public Spit.Module? spit_entry_point(Spit.EntryPointParams *params) {
    params->module_spit_interface = Spit.negotiate_interfaces(params->host_min_spit_interface,
        params->host_max_spit_interface, Spit.CURRENT_INTERFACE);

    return (params->module_spit_interface != Spit.UNSUPPORTED_INTERFACE)
        ? new OnedriveModule() : null;
}

private void dummy_main() {
}

You can now compile this by:

$ make clean; make ; make install

This will install your new module into your local modules directory. To make sure it works, open up shotwell, go to Edit -> Preferences -> Plugins and you should see your new plugin listed under the Publishing section with a generic graphic next to it. If you enable the module you’ll notice the following error that will be fixed when we start implementing functionality

 GSettingsEngine.vala:457: GSettingsConfigurationEngine: error: schema 'org.yorba.shotwell.plugins.enable-state' does not define key 'publishing-onedrive'

Useful Links

Default Linux Config

Sigh.. notes to self on the standard steps when installing a fresh ubuntu desktop:

  • Preserve shotwell indexes: backup/restore ~/.local/share/shotwell
  • add multi user xhost access: add ‘xhost +SI:localhost:testusers >& /dev/null’ to .bash_rc
  • Pulse audio:  copy default.pa to ~/.pulse and add ‘load-module module-native-protocol-tcp auth-ip-acl=127.0.0.1’ to the end. In all test accounts that need audio access, add ‘default-server = 127.0.0.1’ to ~/.pulse/client.conf

Windows NFS server permissions

One issue we recently ran into was linux nfs clients were blowing away inherited permissions on windows volumes. In order to allow rename/mv and chmod to work properly on an nfs (4 or 3) mount, you need to grant clients ‘full permissions’ on the directory they will be working in. This has the lovely side affect of a chmod, rsync, tar -xpf or anything that touches permissions completely changing the local permissions on that directory for ALL users/groups you may have assigned on NTFS

  1. Create a directory, set appropriate ntfs permissions (Full permissions) with inheritance for multiple security groups
  2. Share that directory out to an nfs client.
  3. On the nfs client, mount the volume, and run ‘chmod 700 /mountpoint’
  4. Go back into windows and notice you’ve lost all the inherited permissions you thought you assigned on that share.
  5. Scratch your head, check the KeepInheritance registry key, run tcp dump.
  6. Realize you need to place the permissions you wish to inherit in a place that the nfs client cannot change them.

How we now share volumes out is the following ‘X:\[projectname]\[data]

  • projectname – high level, NOT shared directory that is the holder of all permissions for a project (subfolders, etc).
    • For groups/users that apply to your unix clients make sure they have full permission.
    • For your windows only folks, ‘Modify’ is generally good enough.
  • data – directory that is actually shared out via cifs/nfs

So far this scheme is working pretty well and allows unix clients to work properly and do horrible things on local files while preserving the broader group permissions you wish to see on your windows clients.